Published by Best Fitness Routine. Editorial standards · Report a correction. Educational guidance; no individual clinical review is claimed unless a qualified reviewer is named.
This article includes paid Amazon links. As an Amazon Associate, we earn from qualifying purchases.
A Practical Starting Point
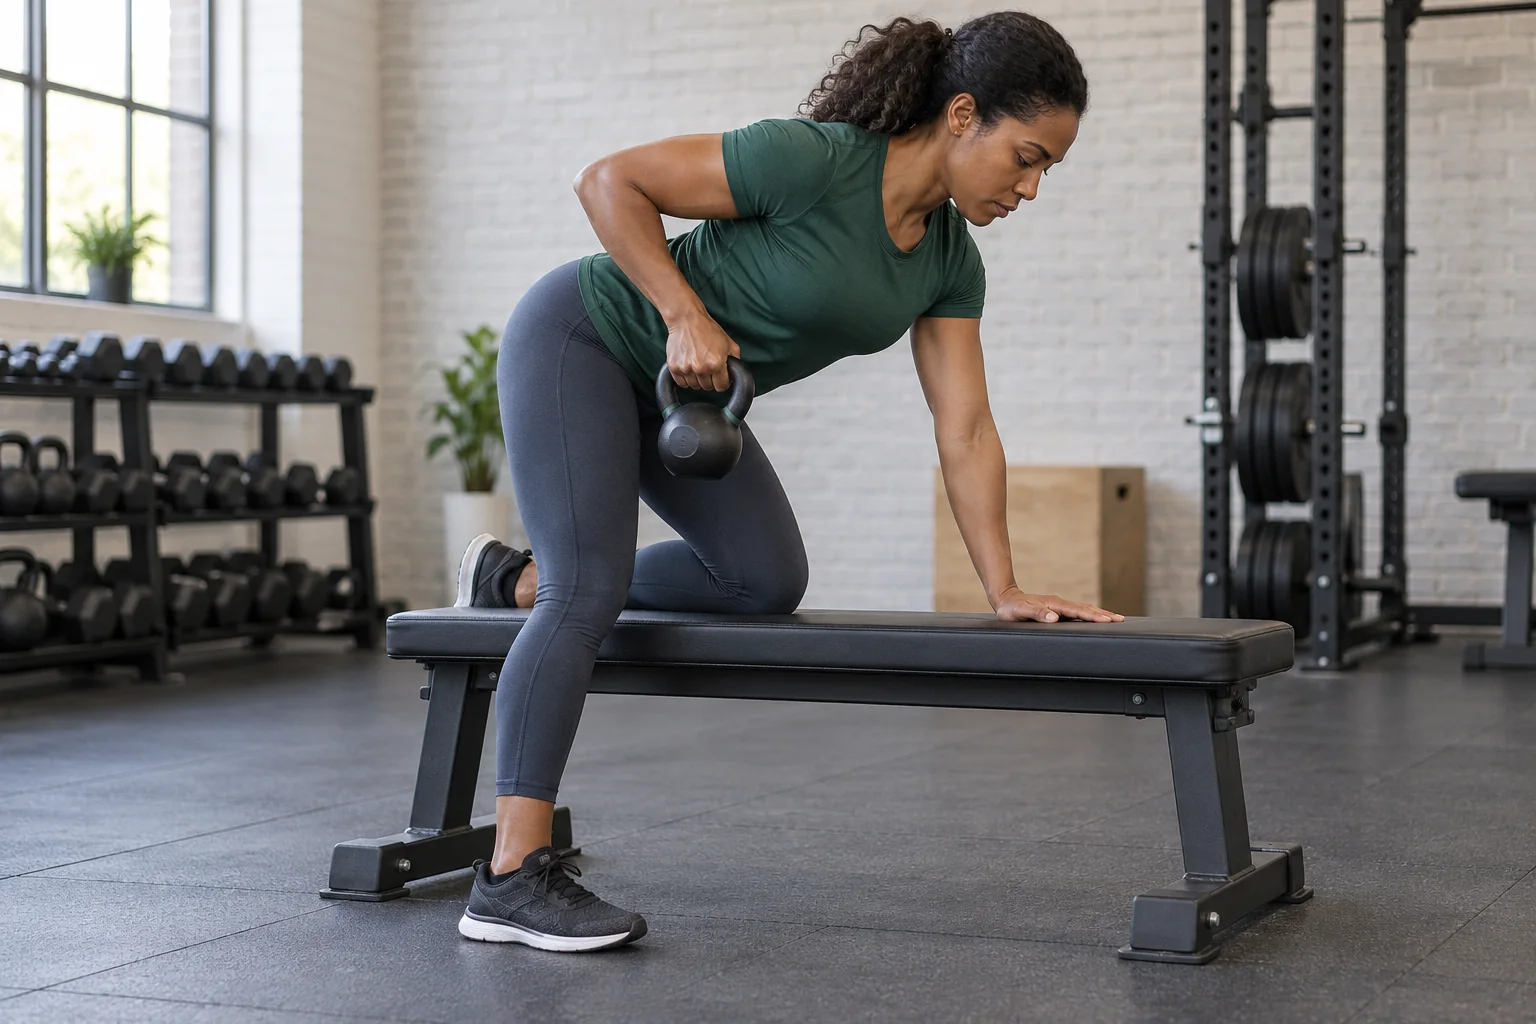
A supported kettlebell row gives one arm a pulling task while a secure bench or other suitable support helps you organize the trunk. This guide uses a bench-supported version so the pull can be practiced without making unsupported hinging the main challenge. Keep the bell controlled from the hanging start to the lowering finish.
Choose support that will stay put
Use a sturdy weight bench intended to support your body weight. Check that its feet do not slide and the padding is secure. A wheeled chair, loose stool or furniture with uncertain stability is unsuitable. Leave room for the bell to hang without hitting the bench or your grounded foot. When comparing flat weight benches (paid link) for support, check the load rating, stable feet and available space.
For the common three-point setup, place one hand and the same-side knee on the bench, with the other foot firmly on the floor. Adjust the spacing so you feel balanced rather than stretched across the equipment. If kneeling on the bench is uncomfortable, ask a coach about a supported standing alternative.
Set the torso before you pull
Keep the back long, the neck comfortable and the shoulders roughly level. The bench supports you, but it should not become an excuse to collapse into the supporting shoulder. Set your stance and brace gently enough to keep the torso steady while breathing normally.
Begin with the working arm hanging below the shoulder and the wrist in a comfortable position. Let the bell settle before the first repetition. A weight swinging underneath you makes it harder to identify whether the back and arm are producing the pull or simply following momentum.
Guide the elbow toward the hip
Pull the elbow back in a controlled path toward the side of the torso. The bell stays near the body rather than drifting far outward. Allow the shoulder blade to move naturally; do not hold it rigidly squeezed before every repetition. Keep the supporting hand pressing into the bench enough to maintain your base.
Stop the pull where you can remain organized. Lifting the elbow much higher by rotating the whole torso is a different movement. Your range is not measured by whether the bell touches a specific point on the ribs.
Lower until the arm is long again
Return the bell with control instead of dropping it to the start. Keep the torso position familiar as the elbow straightens. A smooth lower makes each repetition easier to repeat and gives you time to notice grip or stance changes.
If the bell swings forward or backward, pause, reduce the load and reset. Avoid making the lowering phase a long endurance challenge if it causes you to hold your breath. A simple steady pace is enough for learning the supported row.
Compare sides without chasing identical numbers
You may notice that one arm is easier to coordinate. Start with the less confident side and choose a repetition count you can repeat with control on both. Small differences in comfort or experience are common; a new painful or substantial weakness deserves attention.
Set the bell down and change sides deliberately rather than reaching across the bench to transfer it. Keep a clear path for your feet as you move around the support. Equipment handling is part of the session, especially when grip begins to tire.
Fit the row into a balanced routine
One or two sets of six to ten controlled repetitions per side can be a practical example. Rest between sets and select a load that leaves a few good repetitions available. You do not need to add a heavy hinge or a fast clean to make this pulling exercise useful. A workout logbook (paid link) can make it easier to compare controlled repetitions on the two sides.
Pair it with appropriate squatting, hinging and pressing work across the week. If your session already includes demanding carries or gripping tasks, reduce the total when the hand starts to limit control. A supported row is a strength exercise, not a test of how long you can ignore a slipping handle.
Movement and Session Checklist
- Check the bench and clear the space around your grounded foot.
- Place a hand and same-side knee on the bench with the other foot secure.
- Let one manageable bell hang beneath the working shoulder.
- Pull the elbow toward the hip while the torso stays steady.
- Lower smoothly, set the bell down and reset before switching sides.
Practical Options at a Glance
| What changes | What to try | Good checkpoint |
|---|---|---|
| Torso twists open | Reduce load and shorten the pull | Shoulders stay roughly level |
| Bell swings below you | Pause at the start and slow down | A settled first repetition |
| Supporting shoulder collapses | Adjust bench position and press through the hand | A stable support arm |
| Grip fails before the back works | Shorten the set and reduce load | A controlled return |
Common Mistakes and Better Replacements
Choose purpose-built secure support.
Keep the task a controlled row and reduce load.
Control the bell until it is back at the start.
Frequently Asked Questions
Other row setups exist, but this guide uses secure support. Learn the requirements of an unsupported variation separately.
No. Use the range you can control without twisting or forcing the shoulder.
A manageable common load is a simple starting approach. Individual rehabilitation or major differences may require professional guidance.
Safety and Personal Needs
This guide provides general fitness education and adjustable practice examples, not a personalized exercise prescription or rehabilitation plan. Stop for pain, dizziness, a slipping grip or loss of control. Chest pain, fainting or severe unexpected breathlessness needs urgent appropriate help. Follow individual advice for medical conditions, pregnancy, recent surgery or injury. Learn complex, ballistic and overhead lifts with a qualified instructor; a written guide and illustrative image cannot assess your technique.
Sources and Further Reading
Prepared by the Best Fitness Routine Editorial Team. The example sessions are educational frameworks; they have not been individually tested for every reader. Images are AI-generated illustrations.