Why the Sit-to-Stand Exercise Matters
Standing up from a chair looks ordinary, but it is one of the most useful movement patterns you can train. Every repetition asks your hips, knees, ankles and trunk to work together while you shift your body weight forward, create force through the legs and finish in a stable standing position. That makes the sit-to-stand exercise a practical bridge between gym strength and real life.
You use the same pattern when you rise from a couch, get out of a car, stand from a dining chair or push up from a low bench. If that movement starts to feel slow, uneven or heavily dependent on your hands, targeted practice can help rebuild confidence. The goal is not to turn a basic chair movement into a complicated workout. It is to make an everyday task feel smoother and stronger.
The exercise also fits naturally inside a broader functional fitness routine. It trains a movement you actually use, requires almost no equipment and can be made easier or harder without changing the basic pattern.
How to Do a Sit-to-Stand Exercise With Proper Form
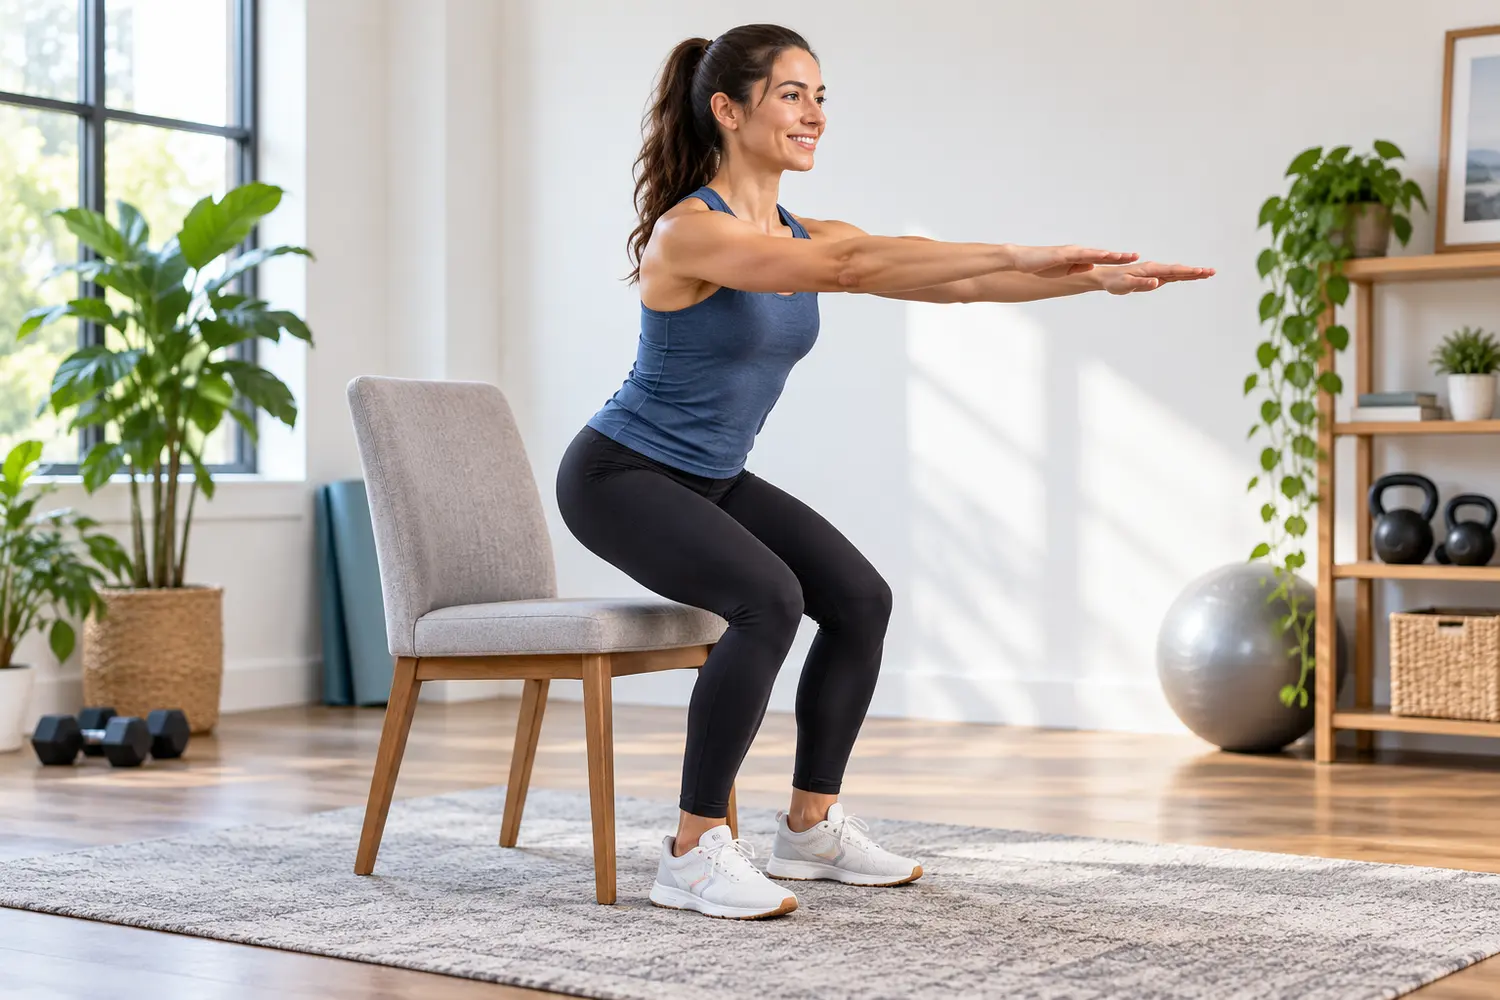
Start with a firm chair that will not roll or slide. If you are unsure about your balance, place the chair against a wall and keep a stable counter or rail within reach. Wear supportive shoes and clear the area around your feet.
1. Set your feet
Sit near the front half of the chair with both feet flat on the floor. A hip-width stance works well for many people. Bring your feet slightly back so your ankles are roughly under or just behind your knees rather than far out in front.
2. Lean from the hips
Keep your spine comfortably tall, then tip your torso forward from the hips. Think about bringing your chest over your feet. This forward weight shift makes it easier to move your center of mass over your base of support.
3. Stand through your legs
Press the floor away and straighten your hips and knees together. Keep the whole foot connected to the ground. Your knees can travel forward as needed, but aim to keep them tracking in the same general direction as your toes instead of collapsing sharply inward.
4. Finish tall
Stand fully upright without throwing your hips forward or leaning backward. Pause briefly and find your balance before beginning the descent.
5. Sit down with control
Reach your hips back toward the chair, bend your knees and lower slowly until you are seated. Avoid dropping the last few inches. The controlled lowering phase is useful strength work, not just a reset between repetitions.
If ankle stiffness makes it difficult to keep your feet planted, our guide to ankle mobility exercises for squats includes drills that can improve comfortable forward knee travel.
Sit-to-Stand Exercise Benefits
The biggest benefit is specificity: you are strengthening the exact pattern used to rise from a seat. But the movement also develops several physical qualities at once.
Lower-body strength
Your quadriceps help straighten the knees, while the glutes contribute strongly as the hips extend. The hamstrings and calves assist, and your trunk muscles help keep the torso organized while your weight shifts. Because several joints work together, the movement is more functional than isolating one muscle at a time.
Balance and coordination
Standing from a chair requires timing. You must move your body weight forward enough to get over your feet, create upward force and then stabilize. That makes sit-to-stands a useful partner to dedicated balance exercises for adults.
Everyday independence
The ability to rise from a chair is closely tied to everyday mobility. The CDC uses a 30-second chair stand assessment as one way clinicians can evaluate leg strength and endurance in older adults. A training set at home is not the same as a clinical test, but the connection shows why this movement matters beyond the gym.
Confidence with squatting patterns
The chair gives you a clear target, which can make the movement less intimidating than a free-standing squat. Learning to control the descent and stand back up can build confidence before progressing to deeper squats or loaded lower-body exercises.
Sit-to-Stand Progressions: From Easier to Harder
Progress the exercise by changing one variable at a time. You do not need to rush toward the hardest version. Choose the variation that lets you move smoothly, keep your feet stable and finish each repetition with control.
Level 1: Assisted sit-to-stand
Use your hands on the chair arms, your thighs or a stable support. Try to let the legs do as much work as they comfortably can while the hands provide just enough help to complete the movement.
Level 2: Higher-chair sit-to-stand
A taller seat reduces how far your hips and knees need to bend. This is useful if standard chair height feels too demanding. A firm cushion can raise the seat temporarily, but make sure it cannot slide.
Level 3: Standard bodyweight sit-to-stand
Cross your arms lightly over your chest or reach them forward for balance. Stand without pushing through the hands, then lower under control.
Level 4: Tempo sit-to-stand
Slow the lowering phase to three or four seconds, pause briefly when you touch the chair, then stand normally. This increases time under tension without adding external weight.
Level 5: Loaded sit-to-stand
Hold a light dumbbell or kettlebell close to your chest once the bodyweight version feels easy and consistent. Keep the load modest enough that your movement quality does not change.
Level 6: Lower seat or staggered stance
A lower chair increases the range of motion. A staggered stance shifts more work toward one leg. These versions are more demanding, so they are better saved for people who already control the standard exercise well.
How Many Reps and How Often?
For general fitness, start with 2 sets of 6 to 10 controlled repetitions, resting about a minute between sets. If that feels easy and your form stays consistent, build toward 10 to 15 reps or choose a slightly harder progression instead of endlessly adding repetitions.
Two or three sessions per week is enough for many people to practice the pattern and build strength. You can also include a few easy repetitions in a warm-up before lower-body training. If you already follow a strength program, treat sit-to-stands as one movement within the plan rather than piling them on top of a high training volume.
For broader lower-body development, combine this exercise with our strength training guide for adults and a consistent core stability and posture routine.
Common Sit-to-Stand Mistakes
- Feet too far forward: This can make it harder to generate force. Bring the feet back until standing feels smoother.
- Rocking for momentum: A small forward lean is useful, but repeated bouncing can hide a strength limitation.
- Dropping into the chair: Slow the final part of the descent so the legs keep working.
- Knees collapsing inward: Keep the knees tracking comfortably over the feet.
- Using a rolling chair: Always choose a stable surface that cannot move unexpectedly.
- Progressing too fast: Add load or lower the chair only after the basic version feels controlled.
Sit-to-Stand vs. Squat: Are They the Same?
They share the same basic family of movements, but they are not identical. A free squat asks you to reverse direction without sitting, while a sit-to-stand includes a clear seated start and finish. The chair reduces uncertainty about depth and can provide a safer target for beginners, people returning to training or anyone who wants to practice the movement with more confidence.
As your strength improves, sit-to-stands can lead naturally into box squats, goblet squats and other lower-body patterns. If mobility is the bigger limiter, add a short daily mobility routine rather than forcing a deeper range before you are ready.
Who Can Benefit Most?
Beginners can use the chair to learn a squat-like movement without guessing how low to go. Adults who sit for long periods can use it as a simple strength break. Older adults often benefit because the pattern closely matches a daily task and can be scaled with chair height and hand support. People returning to exercise after time off may also find it a useful stepping stone before heavier lower-body training.
It can also complement a healthy-aging program. Our healthy aging guide explains why strength, activity, nutrition and recovery all matter for maintaining independence over time.
What About the 30-Second Chair Stand Test?
The 30-second chair stand is a standardized assessment used in fall-prevention and functional-fitness settings. In the CDC STEADI protocol, a person repeatedly stands from a chair for 30 seconds while the clinician counts completed repetitions. That is different from a normal workout set, where your goal is good training quality rather than beating a score.
If you want to track your own progress, a simpler approach is to use the same chair and record whether you can complete your usual set with less hand assistance, smoother control or a slightly lower seat. Those changes can be meaningful without turning every session into a maximum test.
When to Stop or Get Professional Guidance
Muscle effort is expected, but sharp pain, sudden joint pain, dizziness, chest pain or a feeling that you may fall are reasons to stop. If standing from a chair is difficult because of recent surgery, a new injury, severe balance problems or a medical condition that affects exercise tolerance, ask a qualified clinician or physical therapist for individualized guidance.
Do not use a self-test to diagnose weakness or fall risk. The movement is a useful training tool, but symptoms and limitations can have many causes.
Frequently Asked Questions
What muscles does the sit-to-stand exercise work?
The quadriceps and glutes do much of the work, with help from the hamstrings, calves and core. Balance muscles around the hips, ankles and trunk also contribute as you shift your weight and stabilize in standing.
How many sit-to-stands should I do?
Start with 6 to 10 controlled reps for 2 sets. Add repetitions gradually or choose a harder variation once the current version feels easy and your form remains consistent.
Can beginners use their hands?
Yes. Hand support is a useful regression, not a failure. Use only as much assistance as you need, then reduce it over time as your legs get stronger.
Are sit-to-stands good for balance?
They challenge balance during the transition from sitting to standing, but they should not replace dedicated balance practice. Combining both approaches gives you a broader functional-fitness routine.
What chair should I use?
Choose a firm chair without wheels. A higher chair is easier; a lower chair is harder. Place the chair against a wall if there is any chance it may slide.
Key Takeaways
- The sit-to-stand exercise trains an everyday movement while building leg strength and control.
- Start with a stable chair, feet planted and a controlled forward weight shift.
- Use hand support or a higher seat if needed, then progress gradually.
- Two or three weekly sessions can fit well into a general strength routine.
- Stop if you feel sharp pain, dizziness or unsafe balance.
Evidence-Based Resources
Related Health Articles